.png)
Vinyl Wrap Kitchen Makeover
- hellosurvivingmoth
- May 9, 2023
- 7 min read
Since moving into our home four years ago, I have wanted to update our kitchen. The cupboards were a warm red/brown wood tone, the countertops are a very builder-beige Arborite... it was just too blah for me. We had added a little colour (well, just navy blue, but in key locations) to add some life into things, we added a fireplace and built in shelving, and we've updated the front closet to better utilize the space and it's really transformed the front entry. I have loved making our home ours and I really wanted to get the kitchen updated. But let's be honest, a kitchen makeover is exxxxxxpensive.
This was our kitchen before. Mind the mess. I had to grab a picture after I had already started my work on the cupboard!


And this is what it looks like now!


Step 1: Convince The Husband
I've been trying to convince hubs that we need to redo the kitchen. Our cupboards are still in good condition - our home is only 12 years old. So I immediately thought, PAINT! Cost-effective, we can do it ourselves... Perfect! Well hubs was not for it. He was worried that we wouldn't end up liking it and we wouldn't be able to go back to the wood tone and grain that we have currently. I understood his hesitation.
It's funny how our apps "listen" to us because the very next day lo and behold I had a video come across my TikTok For You Page. It was of a kitchen makeover that was done via vinyl wrapping. What?? Yes, like vinyl wrapping a car, but instead, your kitchen cupboards. I did a whole pile of Googling and Youtubing and felt pretty confident that I could tackle this. This might be my fatal flaw - I see something and immediately think, "I can do that". Most times it works out, others I realize that there are people who do this for a reason and I should leave it to them, haha.
Disclaimer #1: I am not an expert, I am a budget-conscious DIY fanatic. I am simply sharing my experience.

Disclaimer #2: I do not know how this would work on a kitchen cupboard door that has a raised panel, or any decorative beveling. We have a simple shaker/framed style door, so that is what I will share. If you have a flat door, you're literally looking at the easiest DIY ever. I might be a bit jealous.
Surprisingly, Hubs was immediately on board. I measured out our kitchen and called to order the vinyl the next day.
The Goods
We ordered Oracel 631 Intermediate temporary vinyl. This is commonly used for wall decals, etc. We used Matte Dark Blue and Matte White. These also come in a gloss finish. A full listing of the colours available can be found here.
Locally, we got these materials as well as a felt edge squeegee from TG Graphics (Saskatoon location). We also used a small, sharp utility knife as well as a measuring tape and straight edge. I also found a pair of tweezers handy to pick up or pull off tiny pieces of sticky vinyl.
The How To
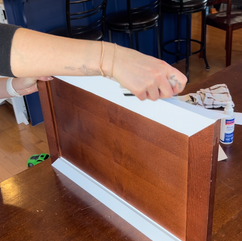
We started by measuring out all the larger surfaces (cabinet ends, island back, etc.) and wrapped those first. If you're doing a long section, utilize the help of a second set of hands! The most important thing to consider when you're starting with a big sheet, is making sure it lines up with your edges except when you plan to cut along the edge when it is laid.

Before you begin the sticking of the vinyl, ensure you wash your surface well, and wipe with rubbing alcohol. This ensures you get all oils from fingers off the surface so the vinyl sticks well.
Remove the backing from just the beginning of the sheet of vinyl and line it up with the edge of the surface. Use your squeegee to move parallel to the beginning edge to slowly move down the sheet of vinyl, peeling the back off the vinyl as you go. Once laid, smooth it all down well and ensure the edges are pressed down well.

Do all the surfaces, ensuring you are wrapping around corners and edges to create a good adherence.
Doors & Drawers
As I stated above, we have shaker style doors on our cupboards, so this is the style I'll be sharing.
1. Again, you'll want to clean your surfaces before beginning.
2. To do a shaker or framed style door, you'll need to measure the long edge and the short edge and the width of the frame.

3. Take the lengths of the edges and add 3" to each length (which will give you an overhang of 1.5" on each length). To obtain the width of each vinyl piece you'll need, take the width of the frame and add 2". You now can cut the strips for the frame edges of your door.
4. Starting with your long edges, lay the strip of vinyl down like you did previously. You'll want it positioned so that you have approx 1.5" of overhang on the length of the vinyl strip; enough overhang on the inside edge of the frame so it fully covers the inside edge and will carry down onto the inside panel slightly; and enough overhang on the outside edge to wrap around to the inside of the door.

5. Press down the vinyl well, and do two small cuts perpendicular to the edge you're working on, right at the corner of the frame.

6. Score (press down along the corner/edge to create a "fold" or "indent") the inside edge of the frame, and press the vinyl down on the inside edge wrapping it all the way to the inside panel.
7. Now you can score the outside edge and find the outer and inner corners.

8. Using your straight edge, line up the inside and outside corners. Now adjust slightly so that you leave excess vinyl. Cut the vinyl here with your utility knife and remove the vinyl you've cut off the edge.

9. Wrap the outside edges and smooth.
10. Now you can do steps 4-7 for the two short edges.
11. Once you have your short edges laid and wrapped on the inside edge, you're going to find the corners, line up with your straight edge, and do a double cut (cutting through the top and bottom layers of vinyl). This will give you a perfect seam - no overlap and no gap.

12. remove the vinyl you've cut off the end, and remove the sliver of a piece you have removed now from the bottom piece of vinyl. This is where I found the tweezers useful!
13. You'll need to measure the inside panel of your door and apply the vinyl in a similar fashion as you did with the larger pieces above.


Finishing It Up
Applying heat to vinyl will make it "shrink wrap" to it's surface. I used a hair dryer on it's hottest setting to go over all edges and seams to ensure they were nice and tight and sealed off. It was interesting to see pieces of vinyl that appeared to be adhered well bubble slightly with the heat. I knew it was not going anywhere now!

Troubleshooting
Bubbles
Bubbles are inevitable. If you can't squeegee them out by pushing them to a seam or an edge, you can poke it with a pin or the blade of your utility knife and push the air out through the small pinhole.
Creases
If you end up with a crease and you just cannot get yourself yo remove the vinyl and try a new piece, you can use some heat on it and try to rub out the crease with the felt side of your squeegee. It likely won't remove the crease fully, but it should improve its appearance.
How It's Holding Up
It's been a month since we underwent the project to makeover our kitchen. I am so happy to say that the vinyl is holding up incredibly. I have absolutely no complaints, there's no lifting or anything!
The Rest
While we were at it, we decided to spruce up our countertops and fixtures too. I found this countertop wrap on Amazon and was so pleased with it. It turned out awesome and has been holding up well. We eventually want to remove the breakfast bar of our island so it's one flat surface, so we'll actually replace our countertops at that point, so this is a fantastic temporary solution!

We have black appliances and I thought black hardware and a black faucet and sink would look so good with the new cupboards and countertops. I have had my eye on a black faucet for a while and during the makeover, it went on sale! It was meant to be, so we purchased it.
New sinks are ridiculously expensive, so we're going to save up for one we want (PS, one big sink, or the double?? We need opinions and experiences!). In the meantime, we used Plasti-dip to coat our current sink. We knew it was a temporary solution and the rubber started to peel right away. It doesn't look awful, it's just annoying. And no one looks in our sink besides us, right?!
We also used Plasti-dip on our knobs, again, because if we ever want to go back to the old look, we could just peel it all off! Can you tell Hubs might have a commitment issue? haha I kid!
The Bottom Line
Now, I've been asked a whole bunch how much this cost, and if it was better/easier/cheaper than painting.
Here's the breakdown:
Vinyl (white and blue, and the blue has done two bathroom vanities, too): $200
Countertop Wrap: $78
Faucet: $209
Plasti-dip: $26
Silicone, Squeegee, misc: $15
TOTAL: $528
As for if it was better/easier than painting? What I liked about the vinyl wrapping was that we could do it at our own pace. We didn't have to take apart our whole kitchen, tarp our garage, and have cupboard doors everywhere while we spray, set, spray, set, etc. I also like that the clean up was literally non-existent. It was easy. I also like that it holds up, but it can be taken off if we every choose we're over it. I would probably cry as I peel it off, haha, but it could be done. The downside would be that it is a bit tedious. It's not just slapping some paint on and being done. You have to pay attention to what you're doing.
Overall, I couldn't be happier with how this project turned out! It's definitely my biggest to date and it was a success! Stay tuned for a stair makeover next! (I promised Hubs I'd take a few weeks without a project... Boo.)


Comments